Why you should use Cloudflare for your next SaaS
/ 5 min read
Table of Contents
Introduction
I’ve been recently using Cloudflare a lot for one of my side projects and I’ve been really impressed by the ease of use, the performance and the huge free tier.
In this post, I’ll share why I think Cloudflare is a great choice for your next SaaS and how you can leverage the free tier to get started with a scalable infrastructure.
Why Cloudflare ?
Cloudflare is one of the most popular cloud providers, yet it often seems overlooked by founders who default to AWS, GCP or even Vercel.
However, Cloudflare provides a lot of managed services that can simplify infrastructure and reduce costs, all of this while offering a free tier for most of their services.
You can essentially run your whole SaaS on Cloudflare, from your database and caching to your serverless functions and frontend.
A quick overview of the main Cloudflare services:
- Workers: Serverless functions that can be used to run your backend code
- R2: Object storage (like S3)
- D1: SQLite database
- KV: Key-value store
- Pages: Frontend hosting
The best part ? Cloudflare offers most of these services for free, making it an excellent choice for your next project.
Free tier: What Can We Get ?
One of the biggest reasons I like to use Cloudflare is its generous free tier, which allows you to start your project with a ready to scale infrastructure (without having to pay anything). With the free tier, you get:
- Workers: 100k inbound requests per day.
- KV: 1 GB of storage and thousands of read/write/delete/list operations per day
- D1: 5 GB of storage, 5 millions read operations and 100k write operations per day
- R2: 10 GB of storage per month and millions of operations per month
- Pages: Unlimited bandwidth
Building an application with Cloudflare
Let’s build a simple link shortener using Cloudflare that will use Workers and KV.
The final code can be found here.
Setting up the project
First, we initialize our project with Hono:
pnpm create hono link-shortener-cfand select the template cloudflare-workers .
Now we create our KV:
pnpm wrangler kv namespace create link-shortenerThis command should output an object that you will need to add to your wrangler.jsonc file, it should look like this now:
{ "$schema": "node_modules/wrangler/config-schema.json", "name": "link-shortener-cf", "main": "src/index.ts", "compatibility_date": "2025-02-24", "observability": { "enabled": true }, "kv_namespaces": [ { "binding": "link_shortener", "id": "xxxxx" } ]}Now that we have created our KV, we can use the script that will generate the Cloudflare bindings:
pnpm run cf-typegenWe’re good to go, let’s write our first worker code.
Implementing the backend
We will need two endpoints, one to create a short link and one to redirect based on the identifier.
First endpoint will be a POST request to create a short link:
// I'm using cuid2 to generate the id, you can use any other library or even implement your own just be sure that it is working with Cloudflare Workers runtimeimport { init } from "@paralleldrive/cuid2";
// don't forget to use the generated bindings to have access to our previously created KVconst app = new Hono<{ Bindings: CloudflareBindings }>();
app.post("/shorten", async (c) => {    const { url } = await c.req.json();
    const createId = init({      length: 6,    });    const id = createId();
    // we store the id and the original url in the KV    await c.env.link_shortener.put(id, url, {        // we can set a TTL to the key to automatically delete it after a certain time        expirationTtl: 60 * 60 * 24 * 30    });
    return c.json({ id });})
Second endpoint will be a GET request to redirect to the original url:
app.get("/:id", async (c) => {    const { id } = c.req.param();
    const url = await c.env.link_shortener.get(id);
    if (!url) {        return c.notFound();    }
    return c.redirect(url);})
Don’t forget to export the app, so that the worker can use it:
export default app;Deploying the application
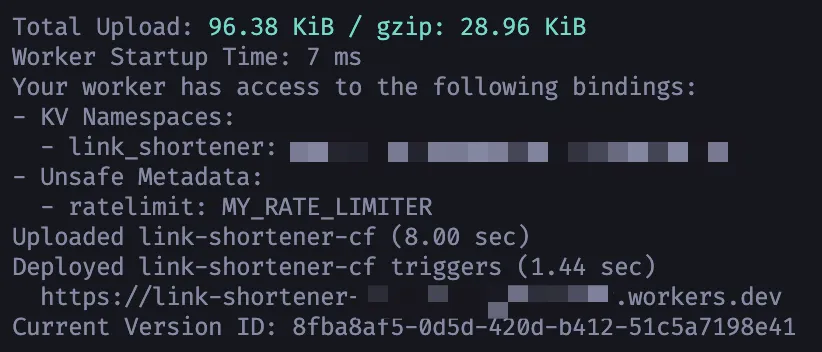
Now that we have our worker code, we can deploy it simply with:
pnpm wrangler deployThis command will deploy the worker to Cloudflare and give you a URL to access it.
Testing the application
Now that we have our worker deployed, we can test it by creating a short link and then redirecting to it.
curl -X POST YOUR_WORKER_URL/shorten -H "Content-Type: application/json" -d '{"url": "https://www.google.com"}'This should return a JSON object with the id of the short link.
Now we can redirect to the original url with:
curl YOUR_WORKER_URL/xxxxxx
Limitations and drawbacks of using Cloudflare
Vendor lock-in
Cloudflare provides a tightly integrated ecosystem, which is great for ease of use and developer experience but also leads to vendor lock-in. If your entire infrastructure relies on Cloudflare, you will need to do significant migration to move to another provider.
Workers custom runtime constraints
When using Workers, you are running your code on Cloudflare’s custom runtime called workerd.
While it maintains compatibility with many Node.js APIs, some libraries may not work as expected, especially those relying on fs or certain crypto functions. You can find more details here.
Conclusion
Cloudflare is a great option for building and scaling your SaaS while keeping infrastructure simple and costs low. With its generous free tier, you can get started without worrying about upfront expenses, all while benefiting from a global, high-performance network.
In this post, we explored Cloudflare’s key services and built a simple link shortener using Workers and KV to showcase how easy it is to deploy an application.
This is just the beginning, there’s a lot more you can do with D1, R2, Durable Objects, and other Cloudflare tools.
If you haven’t tried Cloudflare yet, I highly recommend giving it a shot. You might be surprised by how much you can build without leaving the free tier.